This article is mainly for myself, to remind me what to consider when moving computers. I have two desktop type computers, which back each other up from time to time, and one of which backs up to external storage. I’m to cheap to pay for Cloud storage, at least for the amounts that I use. From time to time, I’ll get a new (used, salvage) computer, which becomes my new primary workstation. The former primary workstation becomes my secondary workstation. The former secondary workstation goes to Craigslist, usually free or nearly so. In this last move, I upgraded the boot drives to SSD (it’s about time), so things were more involved.
My computers boot Windows 10 and Ubuntu Linux 22.04 LTS. That involves additional considerations, because it involves
- Computer A Windows read / write file on Computer B Windows share
- Computer A Windows read / write file on Computer B Linux share
- Computer A Linux read / write file on Computer B Windows share
- Computer A Linux read / write file on Computer B Linux share
- Computer B Windows read / write file on Computer A Windows share
- Computer B Windows read / write file on Computer A Linux share
- Computer B Linux read / write file on Computer A Windows share
- Computer B Linux read / write file on Computer A Linux share
with similar considerations for Remote Desktop.
Install Windows on the new SSD
Use keys from old system, or buy new ones. Create partition to reserve space for Linux later. Leave free space at beginning of drive.
Use rufus.exe to create bootable USB Flash drive from ISO image. Use MFT partition table instead of GPT, if the install target is an old system with BIOS.
On EFI system, everything went smoothly.
On older BIOS system, Windows complains that there is no EFI partition, and install will likely fail. No, it won’t. There IS NO EFI.
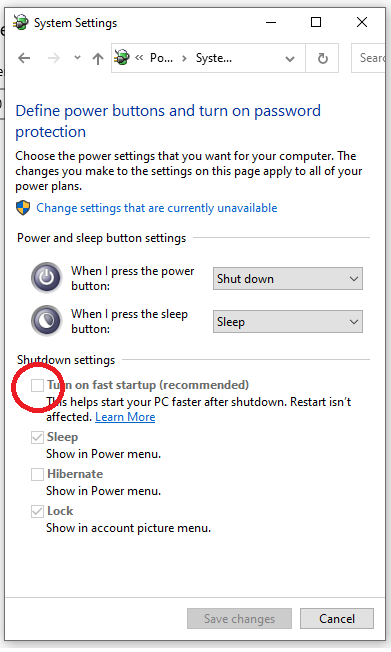
Set the system name.
I suggest setting the volume name of the C: drive to “Win OS” or something similar, for easy ID when Linux mounts it.
(In my case) set a static IP address.
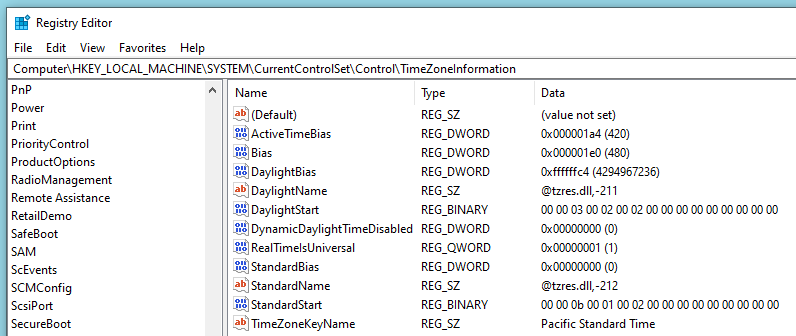
Windows keeps the local time on the hardware real-time clock on the computer. Linux uses Universal time (like GMT). This means that every time the OS changes, the time will be wrong until synced with the internet. My preferred fix is to set this registry key in Windows:
Create (Samba) Shares on the new Windows
In Windows Explorer, right click on the folder(s) or drive(s) you wish to share. Note that these shares are not easily browseable by Linux, but in Ubuntu, one can open Files, choose Other Locations, then Connect to Server at the bottom.
Additionally, because this is all in-house, I set permissions to Full Control for Everyone.
Create Firewall Exceptions on new Windows
Windows 10 complains if its own Defender Firewall is turned off. It’s impossible to disable the warnings. The easiest thing for me to do would be to simply turn the Firewall off, and ignore the warnings that continually nag, since my computers are all in the house, and don’t have high-value data on them. But the more elegant solution is to turn the Firewall ON, and add exceptions as necessary.
Most programs create their own exceptions when installed, but I find that I have to manually add an exception for File and Printer Sharing. In addition, the firewall blocks ping by default. I have to go to Advanced Settings -> Inbound Rules, and choose all the File and Printer Sharing rules for echo (ICMPv4 – in), and set all 6 to YES.
Install Linux on the new SSD
Using Ubuntu, so use Startup Disk Creator to create usb flash drive for install.
Use gparted to delete the dummy partition, and convert it into free space. install linux there.
Set the system name, same as the Windows system name above.
Set a static IP address, identical to the address used for Windows.
Edit the hosts file
Most of my computers are on DHCP, but some are static. The hostname of the computer is not always recognized. In Linux, editing /etc/hosts resolves this. Here is what mine looks like. Only the red lines are my additions:
127.0.0.1 localhost
127.0.1.1 ItxBox
192.168.1.152 pididu
192.168.1.152 pididu.com
192.168.1.156 optiplex
192.168.1.157 itxbox
The following lines are desirable for IPv6 capable hosts
::1 ip6-localhost ip6-loopback
fe00::0 ip6-localnet
ff00::0 ip6-mcastprefix
ff02::1 ip6-allnodes
ff02::2 ip6-allrouters
Windows has a similar file, which is at c:\Windows\System32\Drivers\etc\hosts
Create (Samba) Shares on the new Linux
Here are the contents of my /etc/samba/smb.conf file. Notable settings are highlighted in RED.
#
Sample configuration file for the Samba suite for Debian GNU/Linux.
#
#
This is the main Samba configuration file. You should read the
smb.conf(5) manual page in order to understand the options listed
here. Samba has a huge number of configurable options most of which
are not shown in this example
#
Some options that are often worth tuning have been included as
commented-out examples in this file.
- When such options are commented with ";", the proposed setting
differs from the default Samba behaviour
- When commented with "#", the proposed setting is the default
behaviour of Samba but the option is considered important
enough to be mentioned here
#
NOTE: Whenever you modify this file you should run the command
"testparm" to check that you have not made any basic syntactic
errors.
======================= Global Settings =======================
[global]
Browsing/Identification
Change this to the workgroup/NT-domain name your Samba server will part of
workgroup = FAMILY
avoid protocol SMB1 so that Windows 10 won't complain
client min protocol = SMB2
client max protocol = SMB3
server min protocol = SMB2
server max protocol = SMB3
Windows Internet Name Serving Support Section:
WINS Support - Tells the NMBD component of Samba to enable its WINS Server
wins support = yes
name resolve order = bcast host
server string is the equivalent of the NT Description field
server string = %h server (Samba, Ubuntu)
Networking
The specific set of interfaces / networks to bind to
This can be either the interface name or an IP address/netmask;
interface names are normally preferred
; interfaces = 127.0.0.0/8 eth0
Only bind to the named interfaces and/or networks; you must use the
'interfaces' option above to use this.
It is recommended that you enable this feature if your Samba machine is
not protected by a firewall or is a firewall itself. However, this
option cannot handle dynamic or non-broadcast interfaces correctly.
; bind interfaces only = yes
Debugging/Accounting
This tells Samba to use a separate log file for each machine
that connects
log file = /var/log/samba/log.%m
Cap the size of the individual log files (in KiB).
max log size = 1000
We want Samba to only log to /var/log/samba/log.{smbd,nmbd}.
Append syslog@1 if you want important messages to be sent to syslog too.
logging = file
Do something sensible when Samba crashes: mail the admin a backtrace
panic action = /usr/share/samba/panic-action %d
# Authentication
Server role. Defines in which mode Samba will operate. Possible
values are "standalone server", "member server", "classic primary
domain controller", "classic backup domain controller", "active
directory domain controller".
#
Most people will want "standalone server" or "member server".
Running as "active directory domain controller" will require first
running "samba-tool domain provision" to wipe databases and create a
new domain.
server role = standalone server
obey pam restrictions = yes
This boolean parameter controls whether Samba attempts to sync the Unix
password with the SMB password when the encrypted SMB password in the
passdb is changed.
unix password sync = yes
For Unix password sync to work on a Debian GNU/Linux system, the following
parameters must be set (thanks to Ian Kahan <kahan@informatik.tu-muenchen.de for
sending the correct chat script for the passwd program in Debian Sarge).
passwd program = /usr/bin/passwd %u
passwd chat = Enter\snew\s\spassword:* %n\n Retype\snew\s\spassword:* %n\n password\supdated\ssuccessfully .
This boolean controls whether PAM will be used for password changes
when requested by an SMB client instead of the program listed in
'passwd program'. The default is 'no'.
pam password change = yes
This option controls how unsuccessful authentication attempts are mapped
to anonymous connections
map to guest = bad user
#### Domains
#
The following settings only takes effect if 'server role = primary
classic domain controller', 'server role = backup domain controller'
or 'domain logons' is set
#
It specifies the location of the user's
profile directory from the client point of view) The following
required a [profiles] share to be setup on the samba server (see
below)
; logon path = \%N\profiles\%U
Another common choice is storing the profile in the user's home directory
(this is Samba's default)
logon path = \%N\%U\profile
The following setting only takes effect if 'domain logons' is set
It specifies the location of a user's home directory (from the client
point of view)
; logon drive = H:
logon home = \%N\%U
The following setting only takes effect if 'domain logons' is set
It specifies the script to run during logon. The script must be stored
in the [netlogon] share
NOTE: Must be store in 'DOS' file format convention
; logon script = logon.cmd
This allows Unix users to be created on the domain controller via the SAMR
RPC pipe. The example command creates a user account with a disabled Unix
password; please adapt to your needs
; add user script = /usr/sbin/adduser --quiet --disabled-password --gecos "" %u
This allows machine accounts to be created on the domain controller via the
SAMR RPC pipe.
The following assumes a "machines" group exists on the system
; add machine script = /usr/sbin/useradd -g machines -c "%u machine account" -d /var/lib/samba -s /bin/false %u
This allows Unix groups to be created on the domain controller via the SAMR
RPC pipe.
; add group script = /usr/sbin/addgroup --force-badname %g
###### Misc
Using the following line enables you to customise your configuration
on a per machine basis. The %m gets replaced with the netbios name
of the machine that is connecting
; include = /home/samba/etc/smb.conf.%m
Some defaults for winbind (make sure you're not using the ranges
for something else.)
; idmap config * : backend = tdb
; idmap config * : range = 3000-7999
; idmap config YOURDOMAINHERE : backend = tdb
; idmap config YOURDOMAINHERE : range = 100000-999999
; template shell = /bin/bash
Setup usershare options to enable non-root users to share folders
with the net usershare command.
Maximum number of usershare. 0 means that usershare is disabled.
usershare max shares = 100
Allow users who've been granted usershare privileges to create
public shares, not just authenticated ones
usershare allow guests = yes
======================= Share Definitions =======================
Un-comment the following (and tweak the other settings below to suit)
to enable the default home directory shares. This will share each
user's home directory as \server\username
;[homes]
; comment = Home Directories
; browseable = no
By default, the home directories are exported read-only. Change the
next parameter to 'no' if you want to be able to write to them.
; read only = yes
Roderick: consider home network to be low security, nothing
really valuable. Make me the creator of all files written to
share
force user = young
File creation mask is set to 0700 for security reasons. If you want to
create files with group=rw permissions, set next parameter to 0775.
; create mask = 0700
create mask = 0777
Directory creation mask is set to 0700 for security reasons. If you want to
create dirs. with group=rw permissions, set next parameter to 0775.
; directory mask = 0700
directory mask = 0777
By default, \server\username shares can be connected to by anyone
with access to the samba server.
Un-comment the following parameter to make sure that only "username"
can connect to \server\username
This might need tweaking when using external authentication schemes
; valid users = %S
Un-comment the following and create the netlogon directory for Domain Logons
(you need to configure Samba to act as a domain controller too.)
;[netlogon]
; comment = Network Logon Service
; path = /home/samba/netlogon
; guest ok = yes
; read only = yes
Un-comment the following and create the profiles directory to store
users profiles (see the "logon path" option above)
(you need to configure Samba to act as a domain controller too.)
The path below should be writable by all users so that their
profile directory may be created the first time they log on
;[profiles]
; comment = Users profiles
; path = /home/samba/profiles
; guest ok = no
; browseable = no
; create mask = 0600
; directory mask = 0700
[printers]
comment = All Printers
browseable = no
path = /var/spool/samba
printable = yes
guest ok = no
read only = yes
create mask = 0700
Windows clients look for this share name as a source of downloadable
printer drivers
[print$]
comment = Printer Drivers
path = /var/lib/samba/printers
browseable = yes
read only = yes
guest ok = no
Uncomment to allow remote administration of Windows print drivers.
You may need to replace 'lpadmin' with the name of the group your
admin users are members of.
Please note that you also need to set appropriate Unix permissions
to the drivers directory for these users to have write rights in it
; write list = root, @lpadmin
On Windows, Linux shares may not show up when browsing the Network. To access them, in Windows Explorer, go to \\MyLinuxBox, where that is the name of the Linux machine. If “MyLinuxBox” can’t be found, try pinging it first from Windows, then try again. If that doesn’t work, then try \\192.168.1.104, with the numerical IP address of the Linux machine. A list of shares offered should be shown. Map the desired one to a drive letter if you don’t want to type it manually every time.
Enable VNC on new Windows
Even though windows has its own Remote Desktop, Linux doesn’t work seamlessly with it, neither as a Client nor a Server. To avoid fuss, I just install tightvnc on the Windows machines. I set the Server to run as an Installed Service, and to accept connections with just a password. I used to use UltraVNC, but the included viewer has trouble displaying a large window sent from Linux. The tightvnc viewer has no such problems. Unfortunately, tightvnc is now basically a Windows only solution. There is an old, somewhat buggy version available for Linux, but it hasn’t been supported for years.
Enable VNC on New Linux
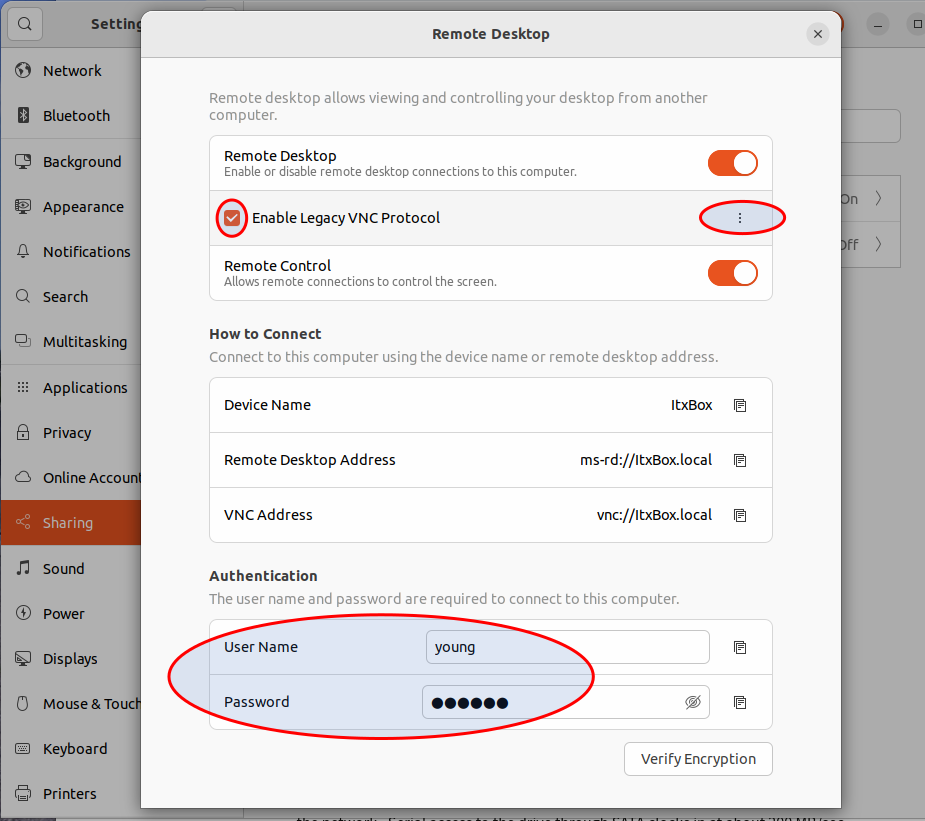
That password set above is saved on the default keyring in Linux, which is generally the Login keyring. That normally gets unlocked when I log in, so no trouble. But on a computer that I want to be headless, there’s a problem. The VNC server won’t run on the remote computer until it’s logged in, so I must auto-login. But if I auto-login, the Login keyring doesn’t get unlocked, and the VNC Server can’t retrieve the saved password, so makes up its own on the fly. I can’t connect with the password I previously chose.
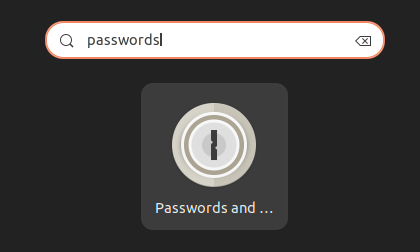
The solution is as follows: in Linux, launch the app for Passwords and Keys. Right-clock on the new Keyring, and make it the Default.
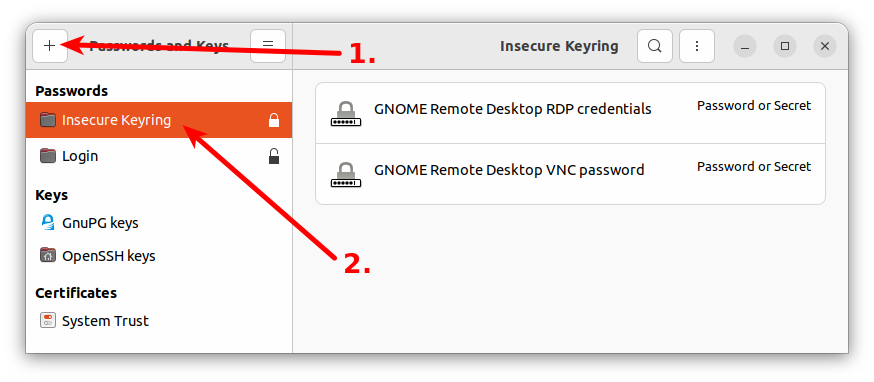
With the Insecure Keyring set as default, go to Settings -> Sharing -> Remote Desktop, and set the password again. It should appear under Insecure Keyring as something like “Gnome Remote Desktop”, possibly two keys. At that point, go back to the Login keyring, and delete the correspondingly-named keys. Finally, right-click on the Login keyring, and set it to be Default once more.
Copy Data from Existing Windows to New System
The fastest way is usually to take the data drive out of the old system and put it in the new, then copy data over from C: to C:. Most of my data is on a separate drive (i.e., D:), which can be moved over in its entirety.
Alternately, a shared folder could be used to do the copy, but that will be limited to the speed of the network. Serial access to the drive through SATA clocks in at about 200 MB/sec.
Don’t forget Download directories, anything on the Desktop. Also, in my case, I have a few old DOS programs in C:\bin
Copy Data from Existing Linux to New System
My Linux data is small enough that it can be transferred through a USB flash drive.
Don’t forget the Downloads and Public directories.
Make Wake-on-LAN (WOL) Work on New System
Enable WOL in EFI or BIOS
In my case, the motherboard is an ASRock Z370m-itx/ac . Press F2 during startup to get into EFI setup. Under ACPI, must configure system to power on from PCI Express.
In some systems, it might be power on from PCI, or LOM (Lan on Motherboard).
Enable WOL in Windows
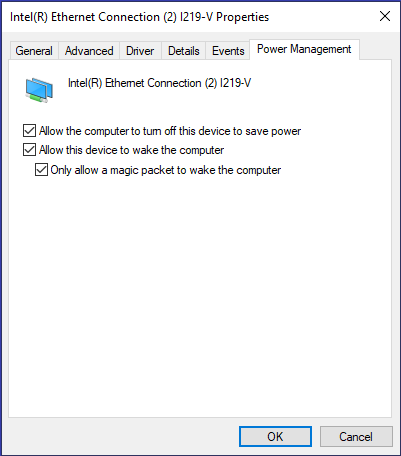
Enable WOL in Linux
Enable WOL on the NIC through Linux. It may already be set from Windows.
$ ifconfig
enp0s31f6: flags=4163 mtu 1500
inet 192.168.2.107 netmask 255.255.252.0 broadcast 192.168.3.255
inet6 fe80::f423:5566:3f80:2e4e prefixlen 64 scopeid 0x20

...

$ sudo ethtool enp0s31f6
Settings for enp0s31f6:
Supported ports: [ TP ]
Supported link modes: 10baseT/Half 10baseT/Full
100baseT/Half 100baseT/Full
1000baseT/Full
Supported pause frame use: No
Supports auto-negotiation: Yes
Supported FEC modes: Not reported
Advertised link modes: 10baseT/Half 10baseT/Full
100baseT/Half 100baseT/Full
1000baseT/Full
Advertised pause frame use: No
Advertised auto-negotiation: Yes
Advertised FEC modes: Not reported
Speed: 1000Mb/s
Duplex: Full
Auto-negotiation: on
Port: Twisted Pair
PHYAD: 1
Transceiver: internal
MDI-X: off (auto)
Supports Wake-on: pumbg
Wake-on: g
Current message level: 0x00000007 (7)
drv probe link
Link detected: yes
It’s already on (“Wake-on: g”), previously set from Windows. But if it wasn’t:
$ sudo ethtool -s enp0s31f6 wol g
Initiate WOL from Windows
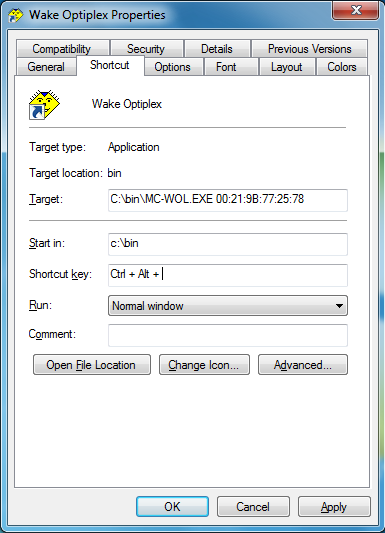
In Windows, I use a program called MC-WOL.EXE, configuring a shortcut to call it.
Initiate WOL from Linux
$ sudo apt install etherwake
I associate nicknames with MAC addresses in the following file:
$ cat /etc/ethers
70:85:c2:5d:8b:90 front
00:21:9b:77:25:78 back
I finally created an alias so that all I need to do to wake the other computer is type “wake front” or “wake back” :
$ cat .bash_aliases
alias wake='sudo etherwake -i enp0s31f6 '
Install Programs on All Operating Systems as Needed
- Chrome Browser (now available for Linux, again!)
- Firefox Browser
- Edge Browser (yes, available for Linux)
- VLC media player
- Syncback
- 7-zip
Make Sure Peripherals Work on Both Operating Systems
- Sound (speakers)
- Microphone
- Printer
- Scanner
- Webcam
Remove Hardware, if Desired, from Old System
If I wanted to retain any cards, memory, or drives from the old system, this would be the time to get them. Actually, I usually do such severe upgrades, that there is little worth salvaging. On my most recent system, the only thing I retained was some aftermarket thumb screws that make the case easier to open.
Scrub the Old System Before Discarding
If there are hard disks in the old system, wipe them of personal data. Some people just remove the disks, entirely, but I’m more surgical about it. I delete my obvious personal data from both Operating Systems, then delete my user account, leaving an Administrator with no password. Then I run ccleaner to overwrite all free space on the disks, which can take 6 hours. This leaves intact operating systems, so if I sell it on craigslist for $5, the person can use it right away.
If there is a CD or DVD drive, make sure you didn’t leave something in it.